You’ve just purchased Minecraft Pocket Edition and now you want to play it with your friends. You’ve checked out realms but you’re not ready to shell out ~ 10$ per month for a realm. The better alternative to Minecraft PE Realms is having your own Minecraft PE Server. A server will give you more flexibility and features in terms of customizability to realms and you can invite your entire group of friends or strangers to join the server and have fun together. In this article I’ll show you how you can create your own Minecraft PE server for free.
Advantages of Minecraft PE servers over Realms:
Highly customizable.Free forever, no monthly recurring fees.High number of concurrent players as opposed to just 11 concurrent players on realms.Realms have limited total users, whereas servers can have as many as you want depending upon the server resources.There are a few ways you can create your own Minecraft PE server for free, here are the best ones:
Create a Minecraft PE server using your own cloud server#
There are a few advantages for creating your own Minecraft PE server on a cloud virtual private server. You don’t have to be dependent on anybody else for server management meaning your worlds won’t just disappear overnight if some third party website goes bankrupt. The uptime is guaranteed to be more than 99.99% unlike Raspberry Pi which can go offline during a local power outage in your area.
Requirements:
Cloud account on either Google / AWS / Azure.A little knowledge of terminal (running commands on a linux machine).First of all you’ll need a VPS server, which you can easily get from Azure/ AWS / Google. All these cloud providers provide some free credits for a year which you can utilise in order to set up a virtual private server.
Free trial credits valid for 1 year: Amazon AWS (300$), Azure (200$),Google (300$).
A good VPS will cost you around 20~25$ per month which will be deducted from the free credits provided to you under trial period, and if your trial runs out, you can continue paying real money or you can always move on to some other cloud provider with a fresh trial account. But you must be thinking that I promised Minecraft PE server free forever above, you’re right! There’s a way to get a forever free machine from Google cloud which will have a limited number of resources but nevertheless be able to support 20 players easily, checkout: Google cloud forever free VPS(just follow step 1 of the other tutorial).
Once you’re done with your VPS, ssh into it you can continue with the further setup of your Minecraft PE server.
Steps to setup PocketMine-MP:#
Create a directory in which you want to install PocketMine-MP into, and cd into it.~> mkdir PocketMeServer && cd PocketMeServerRun the following command to install PocketMine-MP using curl.~> curl -sL https://get.pmmp.io | bash -s -If you don’t have curl installed on the system then you can install it via wget by running the command: ~> wget -q -O - https://get.pmmp.io | bash -s -Make sure you’re running it as a normal user and not via the root user or sudo. Once the above command succeeds then start the PocketMine-MP server using the start script provided ./start.sh (you might have to give execute permissions to the current user on the start.sh file using: chmod +x ./start.sh && ./start.shThe start script will guide you through the setup, if you want to change any variable then just enter it when prompted otherwise it will just pick the default value of the variable which is displayed in the parenthesis.Great Job! Now we have a cloud virtual private server running our own Minecraft PE server. Now to be able to access it from anywhere we just need to do a couple of more things.
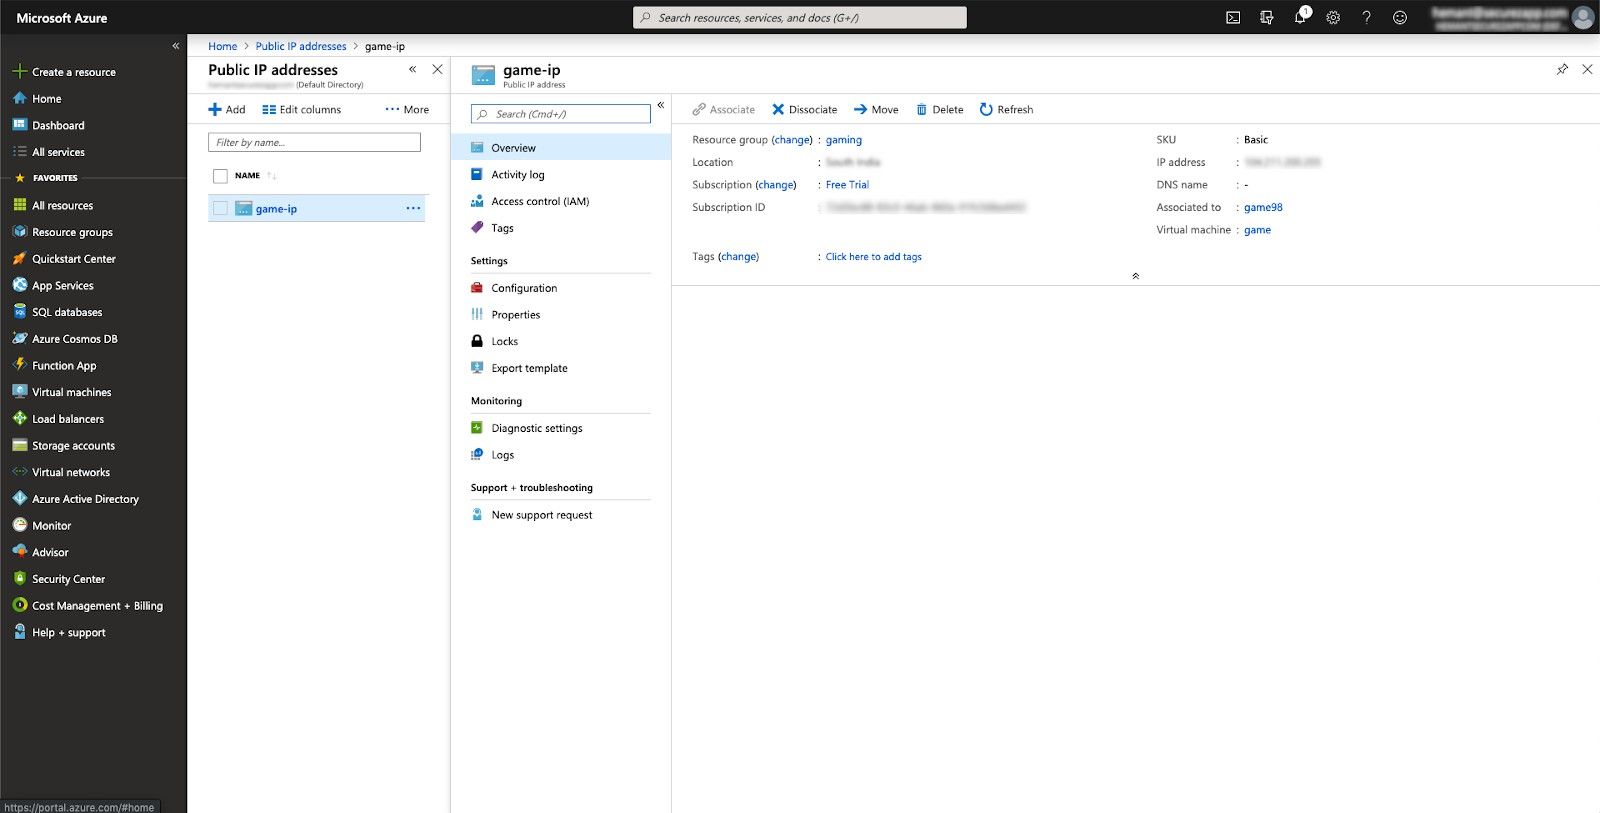
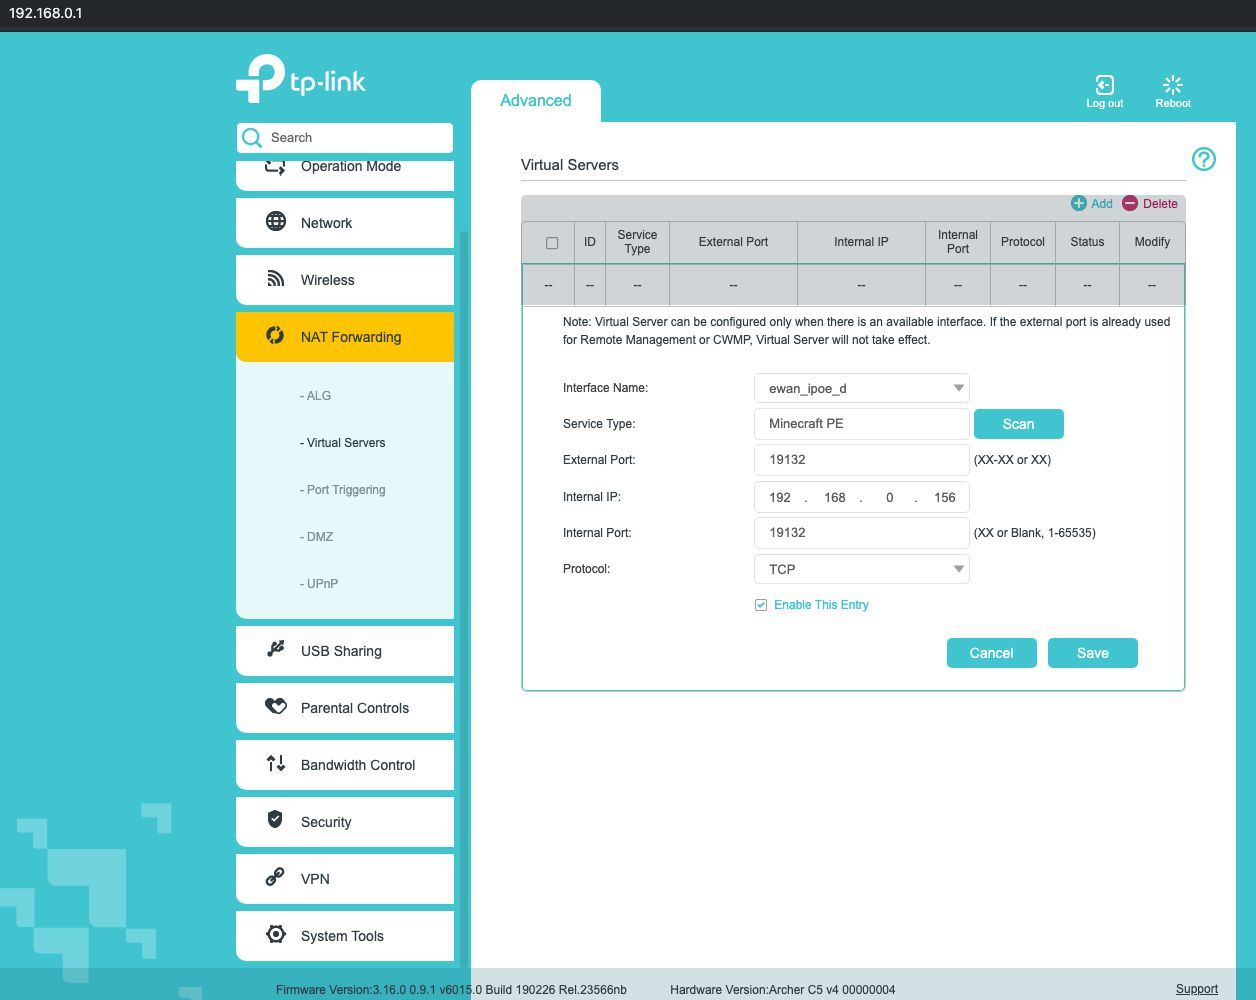
Make sure the cloud server is assigned a static. Expose the Minecraft PE server port publicly so that anyone can connect to it. (Default port: 19132).Azure
For setting a Static IP on Azure Machine, go to
Azure Portal -> Public IP Addresses -> Add -> Associate to your existing machine.
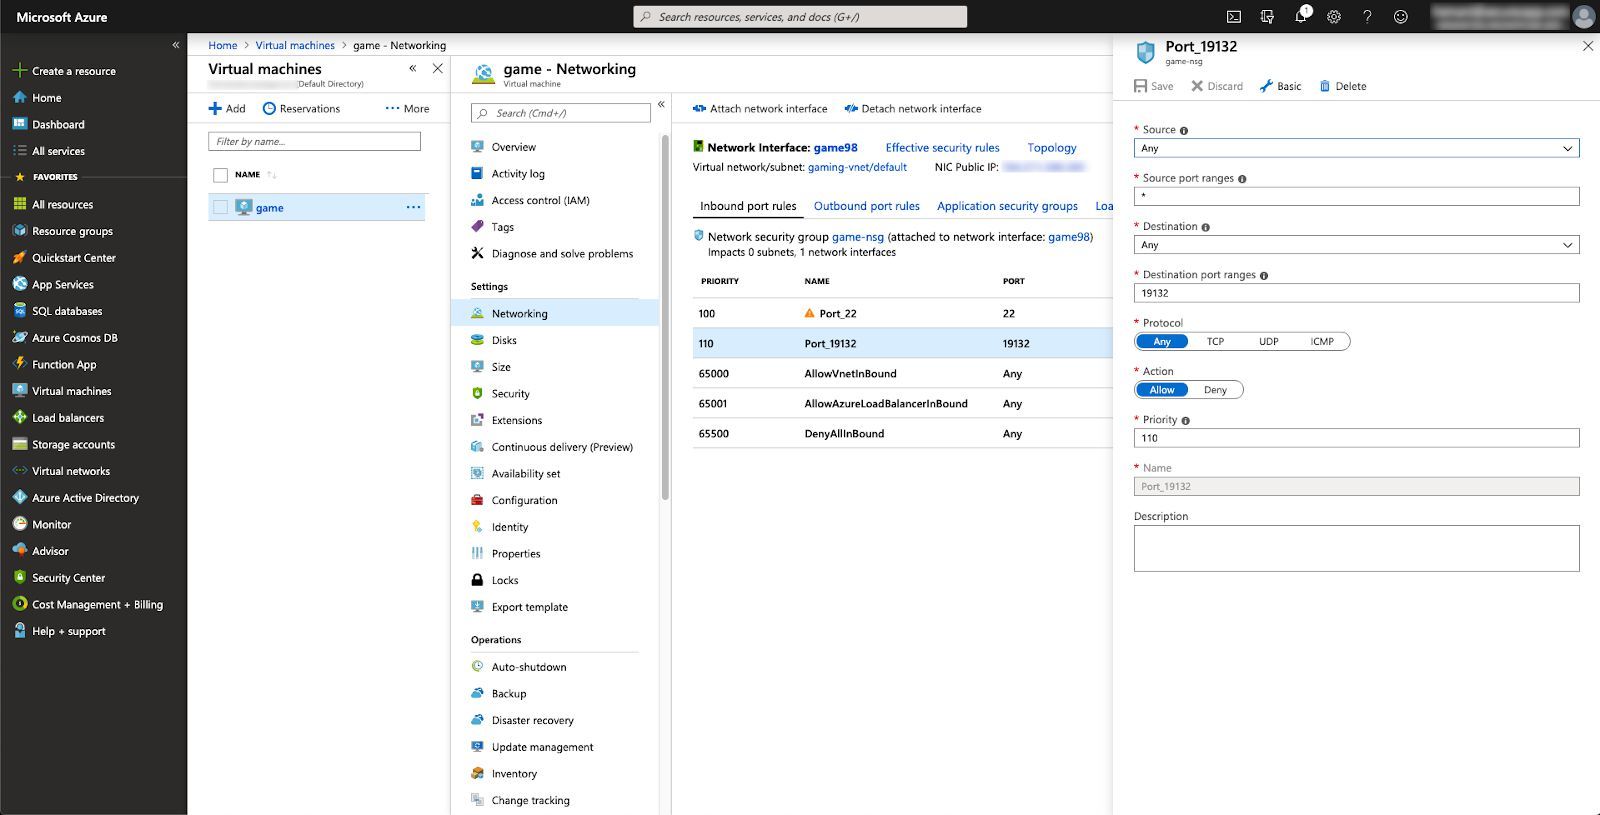
Allow port 19132:
Azure Portal -> Virtual Machines -> Networking -> Add inbound port rule -> Allow 19132.
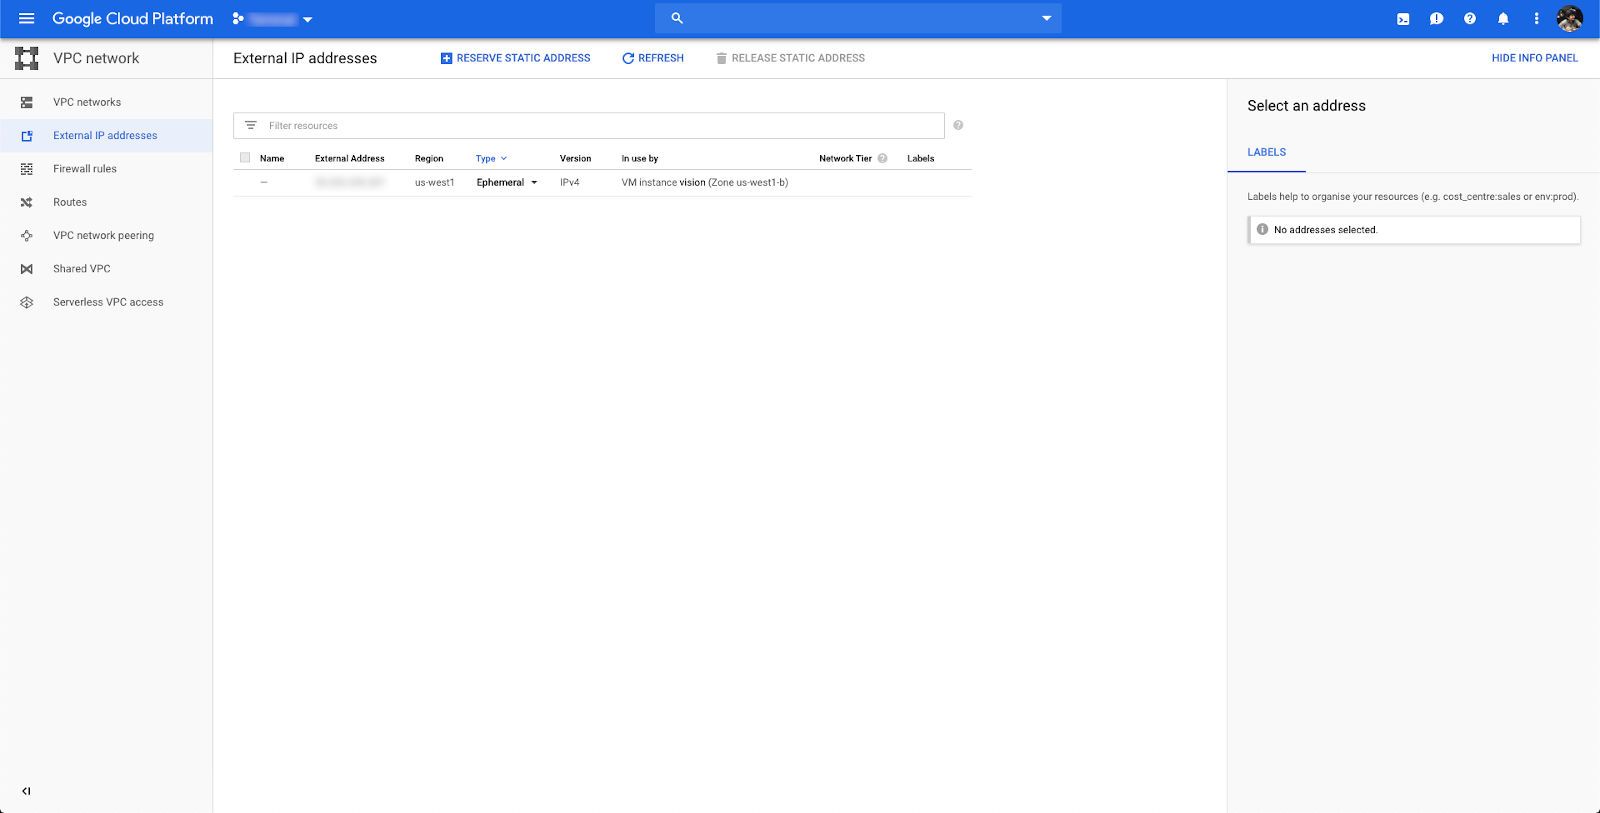
For External IP for the VPS:
Google Cloud Console -> VPC Network (left side bar) -> External IP Addresses -> Reserve Static Address -> Associate to your VM Instance.
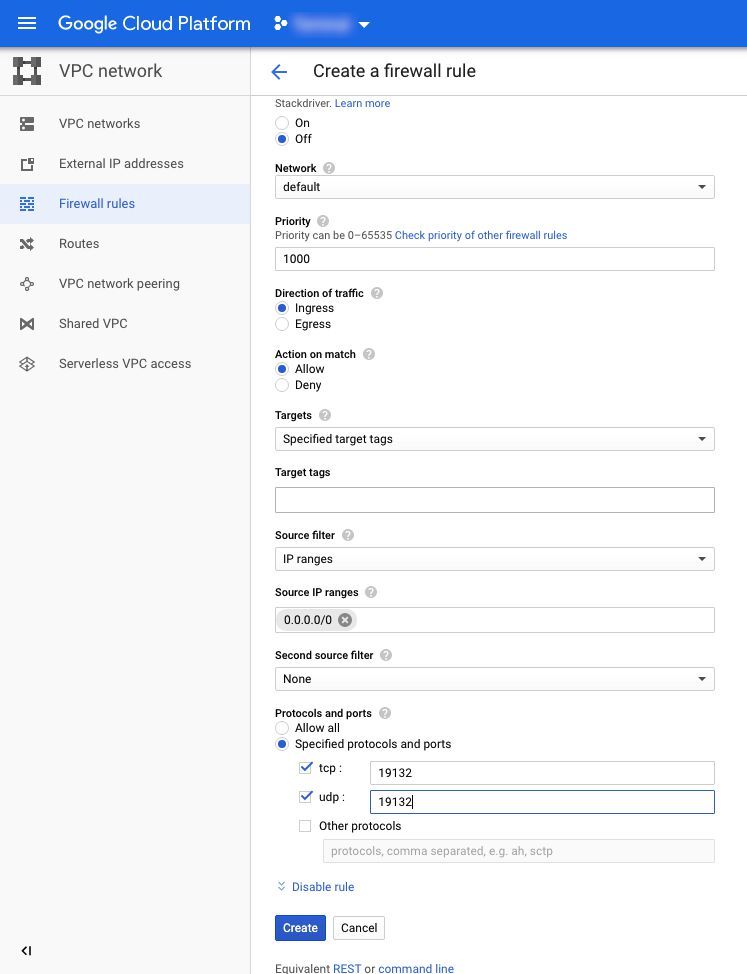
Allow port 19132:
Google Cloud Console -> VPC Network (left side bar) -> Firewall Rules -> Create a firewall rule -> Allow 19132 from all IPs.
AWS
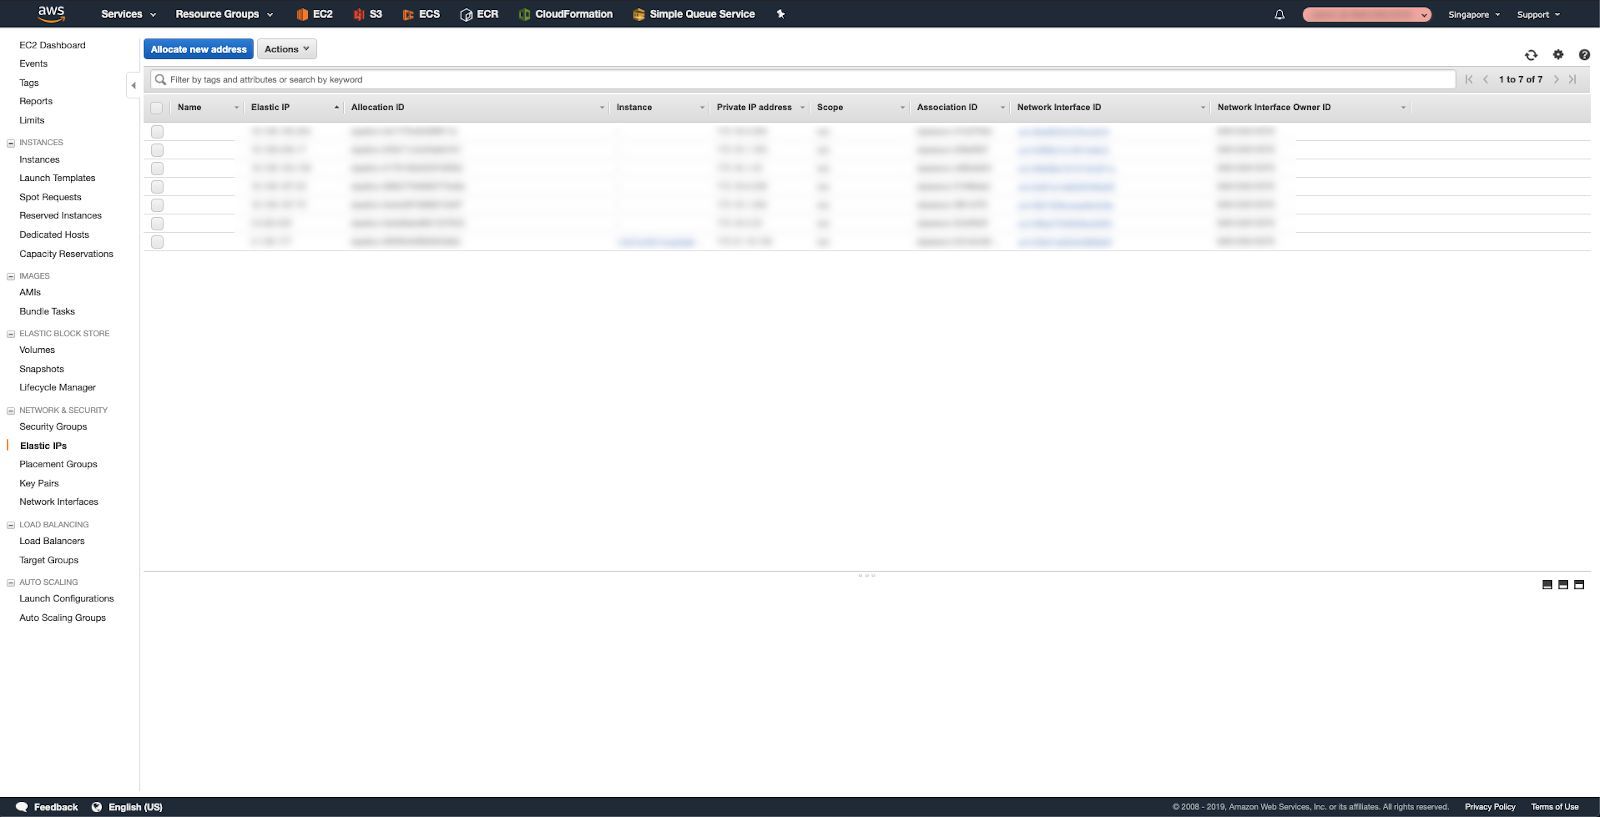
For AWS Public IP:
AWS Management Console -> Services -> EC2 -> Elastic IPs (left side bar) -> Allocate new address -> Associate to your ec2 instance.
Allow port 19132:
AWS Management Console -> Services -> EC2 -> Security Group (of your instance) -> Edit inbound rules -> Allow 19132.

Once you’ve completed all the steps, you will be able to connect to your Minecraft PE Server using the Public IP on the port 19132 in the Minecraft Pocket Edition Application.
Create a Minecraft PE server using Raspberry Pi#
Requirements:
Raspberry Pi Raspbian or any unix based distro.I’m assuming you’ve already setup your Raspberry Pi, if you haven’t then set it up and `ssh` into it. Once you’re logged into the Pi, all you need to do is to follow the steps to installPocketMine-MP above. Raspberry Pi with a unix based distro is exactly like your own private server. The only thing that changes in case of a Raspberry Pi is that you don’t need to setup a public IP, your public static IP is already assigned to you by your ISP. Make sure your public IP is a static ip and doesn’t change when you restart the wifi router.
Port forwarding: Find the local IP address of your Raspberry Pi and go to your router settings. Find the port forwarding settings and add a new rule to allow any traffic on the port 19132 of the External IP address is redirected to the port 19132 of your local IP address of the Raspberry Pi.
Note: Static IPs from ISPs cost real money, there’s a big possibility that the ISP assigns you a dynamic IP instead of a static one unless you ask them. To verify port forwarding is working go to linkand check by putting your public IP and port in the designated areas. The port should be open and not closed.
After port forwarding is successful, you should be able to connect to your Minecraft PE server using your static IP and port.
Create a Minecraft PE server using an Online Service – Aternos#
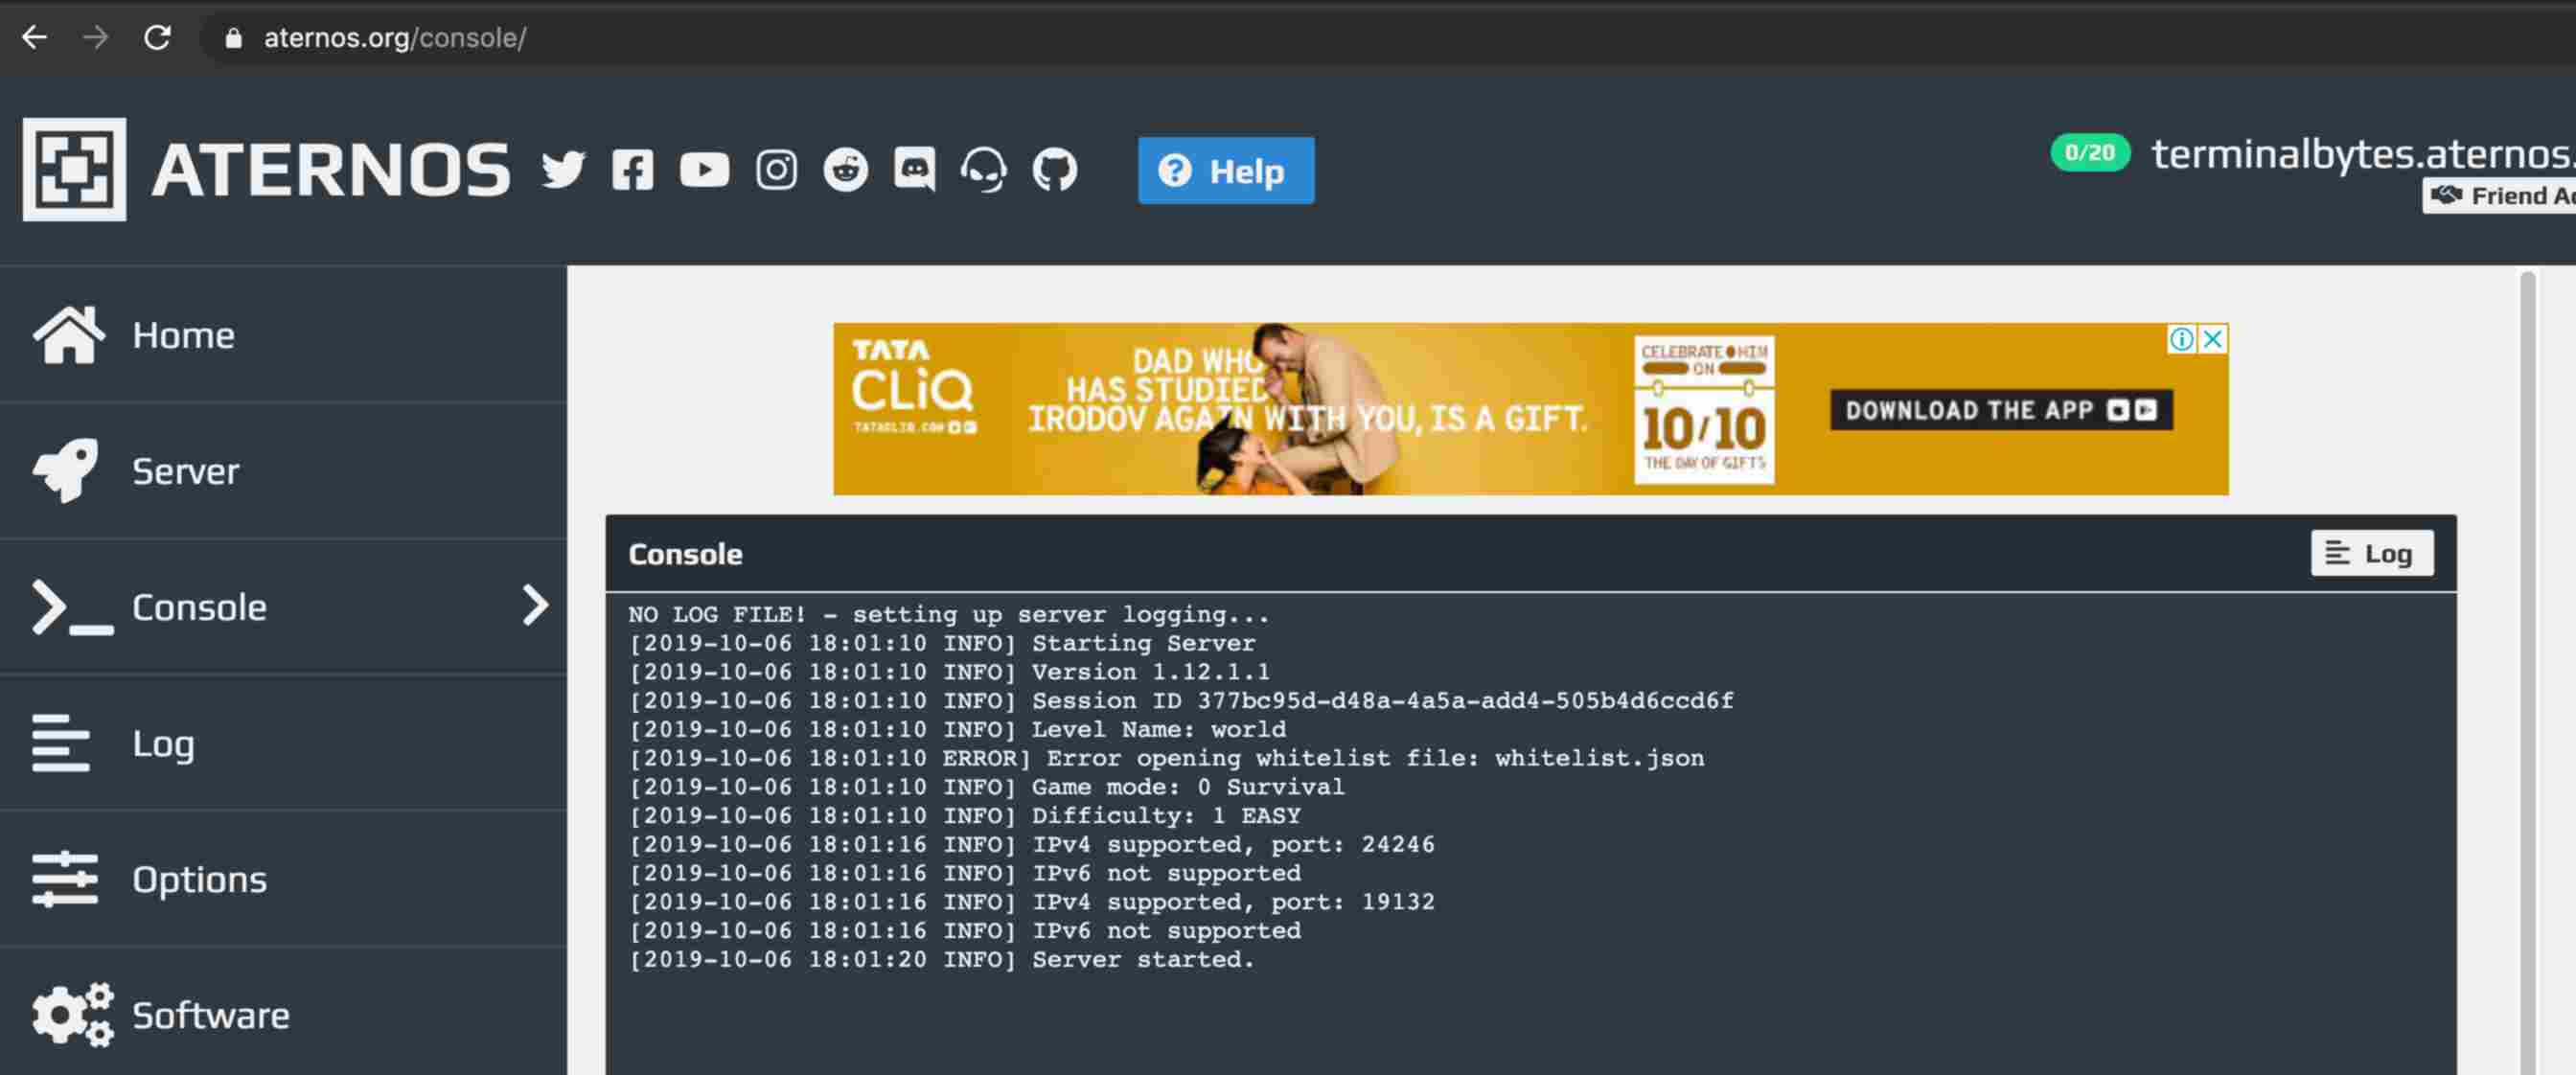
Setting up your own Minecraft PE server for free using Aternos is quite straight forward. All you need to do is go to Aternos.comand create a new account. From there you can manage your server. You can check the current progress of your server in the console section of the panel. Aternos also allows you to install mods / import worlds etc. It is not the perfect solution though, it has a few disadvantages as well.
Disadvantages:
Server shuts down after a few minutes of inactivity, i.e if no players are connected to it. You’ll then have to log into the admin panel once again to start the server again.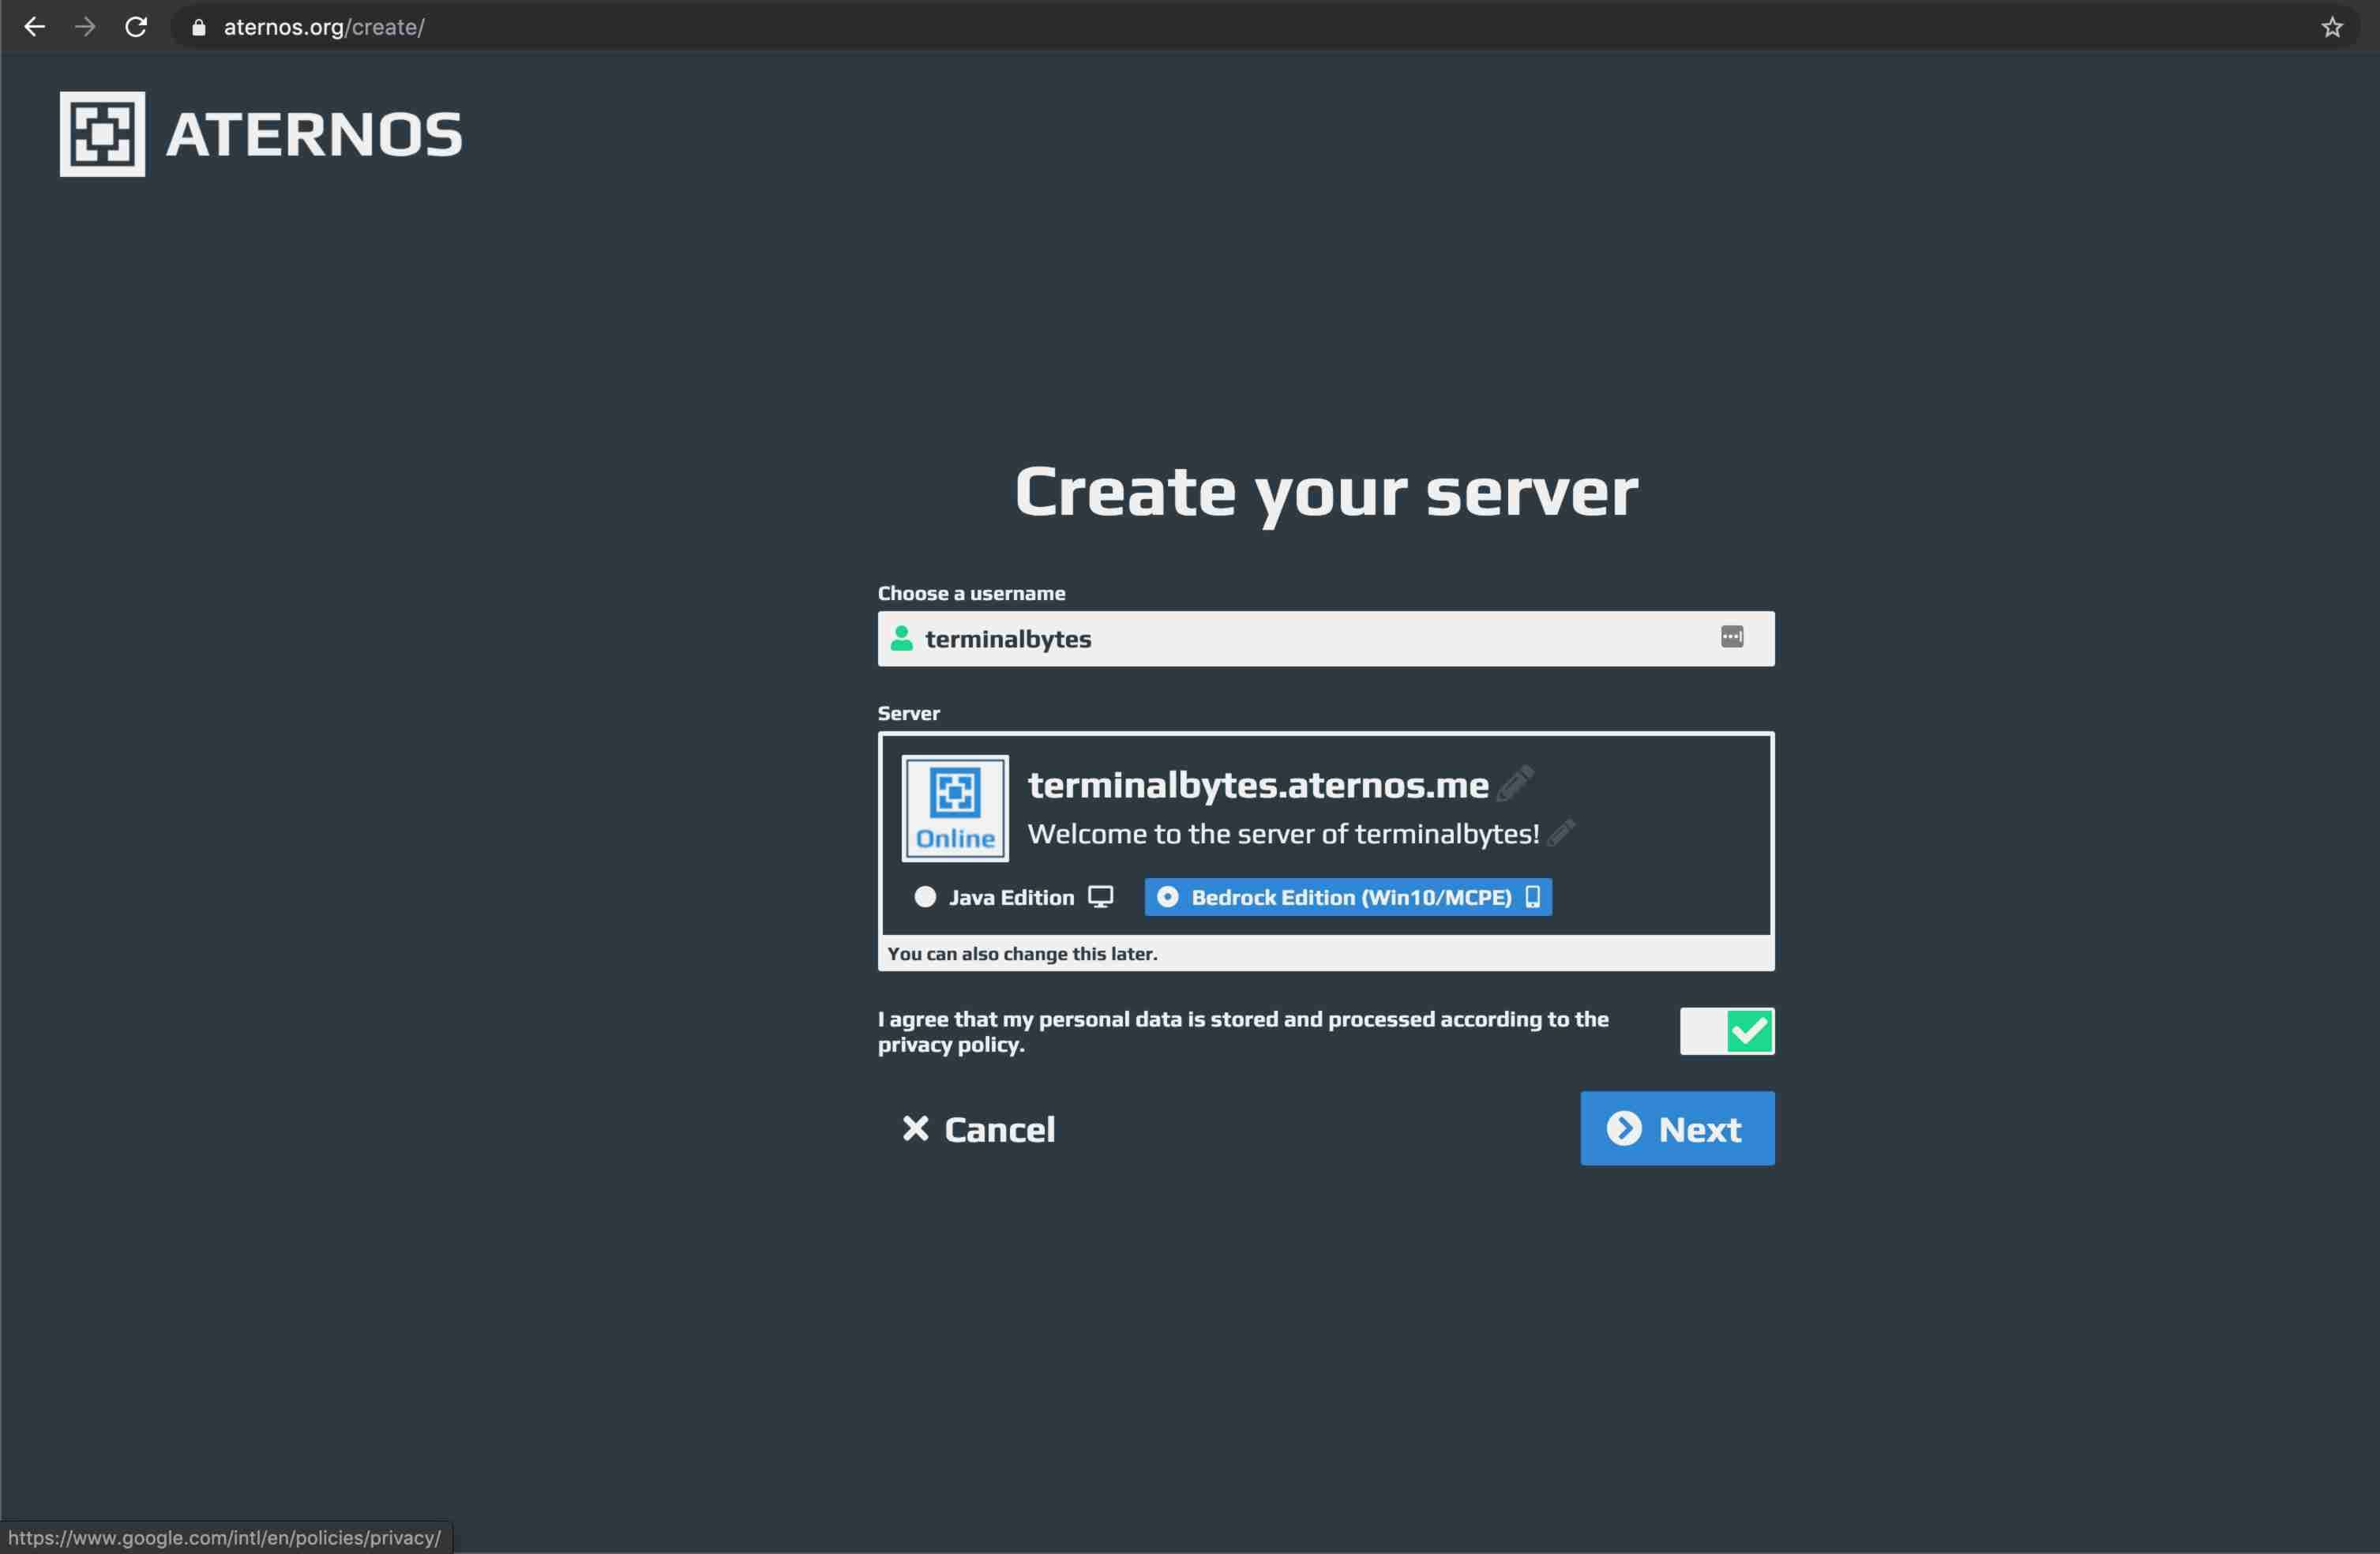
Congratulations on setting up a your own Minecraft PE Server for forever free. Enjoy playing Minecraft PE and invite your friends over to your newly generated worlds. Feel free to post a comment or a suggestion in case you get stuck anywhere during the setup.
Also, if you’re looking for a managed Minecraft PE Server, you can check out Evolution Host, they provide DDoS protected Minecraft servers.
« Prev PageRunning a Forever Free Wordpress Blog with Your Own Domain on Google CloudNext Page »Access 'GeForce Now' in India


